Tag: template sensor

  • Template Sensor and Attribute issues in Home Assistant

    I came across an interesting issue today and thought it worth documenting.

    I have setup a template sensor which is triggered by the state change of an entity. This template sensor saves a generic state (a string saying OK), storing a maximum or minimum value of the referenced entity as an attribute. Its a daily maximum, so I reset it at midnight.

    Screenshot 2025-09-04 at 13.40.11

    Template Sensor Setup

    In order to calculate if for example the "new" state of the entity was higher than the previous maximum value stored in the attribute, I have this logic in the template sensor YAML:

    attributes:
        max_rain: >
            {% set r_new = states('sensor.tempest_precipitation_intensity') | float(-1) %}
            {% set prev = this.attributes.max_rain | float(-1) %}
            {{ [r_new, prev] | max if trigger.platform != 'time' else r_new }} 

    So, create a variable r_new of the current state of the precipitation intensity entity, otherwise return -1.

    Next, set a variable prev to get the previous value of the current template sensor attribute (max_rain), otherwise return -1.

    Finally set the max_rain attribute to the largest of the two variables (r_new or prev), or reset to the current state (r_new) at midnight.

    The Problem

    If you test out this YAML logic in the developer tools, it works without error. E.g.

    {% set r_new = states('sensor.tempest_precipitation_intensity') | float(-1) %}
    {% set prev = state_attr('sensor.today_weather_statistics', 'max_rain') | float(-1) %}
    {{ [r_new, prev] | max }}
    Screenshot 2025-09-04 at 13.27.27
    Screenshot 2025-09-04 at 13.27.35

    The result here is 0.0, which reflects the current state from sensor.tempest_precipitation_intensity. In this case prev is returning -1 because the attribute max_rain does not exist on sensor.today_weather_statistics. All expected so far.

    The REAL problem

    The issue comes in when we’re trying to create this template sensor for the first time and establish the max_rain attribute. Because the logic to create and update the max_rain attribute references itself, something internally seems to fail. This all happens despite the YAML being safe in the developer tools. E.g.

    {% set prev = state_attr('sensor.today_weather_statistics', 'max_rain') | float(-1) %}

    Returns -1 safely in the developer tools. But it seems this kind of reference to itself cannot work on the first initialisation of the attribute itself. What you’ll find is the attribute never appears in your template sensor.

    Solution

    So instead of creating the self referencing logic in the first place, the easiest thing to do is something like this, where you create the attribute and assign a default value:

    - trigger:
      - platform: state
        entity_id: 
            - sensor.tempest_precipitation_intensity
      - platform: time
        at: "00:00:00"
      sensor:
        - name: 'Today Weather Statistics'
          unique_id: today_weather_statistics
          state: "OK"
          attributes:
            max_rain: >
                {{ float(0.0) }}

    Restart Home Assistant, go check out your new sensor, and confirm the max_rain attribute appears, with a value of 0.0.

    Now you’re ready for the self-referencing logic to work and not fail. Go back to your template sensor YAML, and update the max_rain logic:

    - trigger:
      - platform: state
        entity_id: 
            - sensor.tempest_precipitation_intensity
      - platform: time
        at: "00:00:00"
      sensor:
        - name: 'Today Weather Statistics'
          unique_id: today_weather_statistics
          state: "OK"
          attributes:
            max_rain: >
                        {% set r_new = states('sensor.tempest_precipitation_intensity') | float(-1) %}
                        {% set prev = this.attributes.max_rain | float(-1) %}
                        {{ [r_new, prev] | max if trigger.platform != 'time' else r_new }} 

    Restart Home Assistant – this time you should still see your attribute, but most importantly, see the value increase from 0.0, should the state of your reference entity be higher.

  • Measuring Forecast PV Vs Actual PV in Realtime on Home Assistant

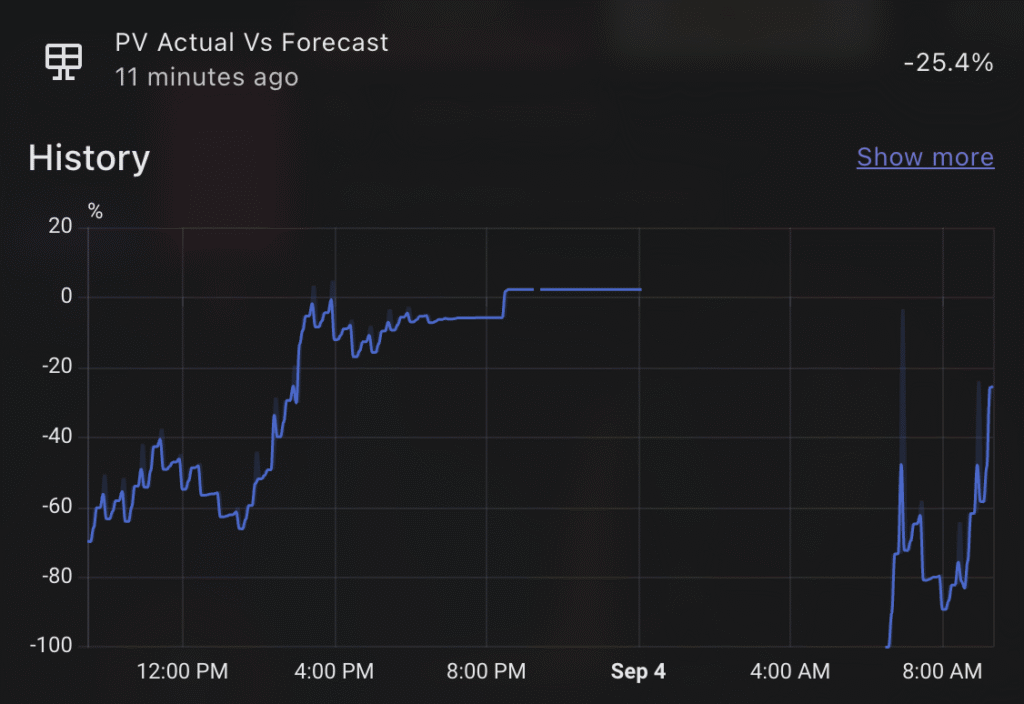
    One of the most powerful aspects of Home Assistant is being able to stitch together data from multiple sources to create meaningful insights. In this post, I’ll walk through how I created a sensor that compares the predicted solar generation against the actual solar energy generated by my system, giving me a live percentage difference throughout the day.

    Screenshot 2025-09-01 at 17.36.56

    This is particularly useful to understand how accurate your solar predictions are, and whether your solar generation is outperforming (or underperforming) expectations as the day progresses.

    Why this sensor?

    I use Predbat to manage my solar battery charging and discharging logic. One of its inputs is a daily solar PV forecast, which it sources from Solcast (if configured).

    While my GivEnergy inverter provides solar generation figures, I’ve found that the SolarEdge integration (via my SolarEdge export meter) provides more accurate daily totals. You can install a SolarEdge integration through Home Assistant if you have this setup. So for this comparison, I use:

    • Predbat’s detailedForecast attribute from sensor.predbat_pv_today for the expected PV generation in 30 minute slots
    • SolarEdge’s sensor.solaredge_energy_today as the actual generated PV value

    How it works

    The custom template sensor does the following:

    1. Iterates over each 30-minute slot in the Predbat detailedForecast.
    2. Sums up all past PV forecasts (based on current time) to create a "so-far" forecast.
    3. Compares that to the actual solar generated today from SolarEdge.
    4. Calculates the percentage difference, showing how far above or below the forecast we are right now.

    This is a dynamic sensor, updating as time passes and more of the forecast becomes "in the past."

    What it tells me

    Solar PV Prediction chart

    The resulting percentage gives me a clear sense of solar performance in real time. For example:

    • If the value is positive, I’m generating more than expected.
    • If it’s negative, I’m falling behind the forecast.

    This can help explain battery decisions, why Predbat may or may not be dispatching energy, and offer insight into Solcast’s accuracy over time. I tend to find, due to the nature of the solarEdge updates, that the PV predicted is always higher than what I have achieved, but slowly throughout the day it catches up. Sometimes I get lucky and outperform the PV prediction!

    Predbat’s DetailedForecast attribute

    Within the PV prediction entity for today, Predbat provides a DetailedForecast attribute, which is a 30 minute breakdown. My sensor is based on pv_estimate, but you can choose whichever you want, just update the YAML accordingly.

    DetailedForecast
        - period_start: 2025-09-04T15:30:00+0000
            pv_estimate: 1.96
            pv_estimate10: 0.6
            pv_estimate90: 2.44
            pv_estimateCL: 1.66
        - period_start: 2025-09-04T16:00:00+0000
            pv_estimate: 1.76
            pv_estimate10: 0.48
            pv_estimate90: 2.08
            pv_estimateCL: 2.01

    The Template Sensor YAML

    Below is the full YAML snippet you can use in your configuration.yaml or template sensor configuration file:

    sensor:
      - name: "PV Actual Vs Forecast"
        unique_id: pv_actual_vs_forecast
        state_class: "measurement"
        unit_of_measurement: "%" 
        state: >
          {% set total = namespace(value=0) %}
          {% for item in state_attr('sensor.predbat_pv_today', 'detailedForecast') %}
              {% if item.pv_estimate is number %}
                  {% if strptime(item.period_start, "%Y-%m-%dT%H:%M:%S%z") <= now() %}
                      {% set total.value = total.value + (item.pv_estimate / 2) %}
                  {% endif %}
              {% endif %}
          {% endfor %}
          {% set currentSolar = states('sensor.solaredge_energy_today') | float %}
          {% set absolute_difference = currentSolar - total.value %}
          {% set percentage_difference = (absolute_difference / total.value) * 100 %}
          {{ percentage_difference }}
        icon: mdi:solar-panel

    Note: The division by 2 (item.pv_estimate / 2) accounts for each forecast slot being half an hour, and we want pv_estimate to be the kWh value.

  • Capturing Min / Max Weather values in a Home Assistant Entity

    Tracking daily weather extremes in Home Assistant can be a really useful addition to your dashboard, especially if you’re keen to understand trends over time or highlight key information visually.

    Screenshot 2025-09-01 at 11.29.31

    In my case, I wanted a lightweight, efficient way to display the maximum temperature, minimum temperature, and maximum wind speed recorded during the day. Not only does this create a simple historical snapshot, but it also enables me to power Mushroom Template Cards with rich attribute data, without needing to rely on external integrations or long-term statistics.

    The Template Sensor

    Here’s the YAML I used to create a template sensor that records today’s key weather stats. This sensor uses a combination of state and time-based triggers to reset at midnight and accumulate data throughout the day.

    - trigger:
        - platform: state
          entity_id: 
            - sensor.tempest_temperature
            - sensor.tempest_wind_speed
        - platform: time
          at: "00:00:00"
      sensor:
        - name: 'Today Weather Statistics'
          unique_id: today_weather_statistics
          state: "OK"
          attributes:
            max_temp: >
              {% set t_new = states('sensor.tempest_temperature') | float(-99) %}
              {% set prev = this.attributes.max_temp | float(-99) %}
              {{ [t_new, prev] | max if trigger.platform != 'time' else t_new }}
            min_temp: >
              {% set t_new = states('sensor.tempest_temperature') | float(99) %}
              {% set prev = this.attributes.min_temp | float(99) %}
              {{ [t_new, prev] | min if trigger.platform != 'time' else t_new }}
            max_wind: >
              {% set w_new = states('sensor.tempest_wind_speed') | float(-1) %}
              {% set prev = this.attributes.max_wind | float(-1) %}
              {{ [w_new, prev] | max if trigger.platform != 'time' else w_new }}

    How it works

    • State triggers respond to changes in sensor.tempest_temperature and sensor.tempest_wind_speed. Every time they update, the template checks if the new value exceeds (or undercuts) the previous attribute value and stores the result.
    • Midnight reset is achieved via a time-based trigger at 00:00:00. At this point, the values reset to the current readings (effectively seeding the day).
    • The state is set to "OK" as a placeholder—it’s not used for charting or display, but helps avoid null states.

    Home Assistant issues with adding new attributes

    I found (randomly it seems not predictably) that some of the new attributes would not be created on their first load, once I restarted Home Assistant. It was very frustrating to debug, the logic is to set a variable from a entity state, or otherwise set a float – but something is failing. If you too are finding that the attribute isnt appearing, instead – establish the attribute more simply with a default value. Restart HA and confirm the attribute now shows up. E.g.

            max_wind: >
              {{ float(0) }}

    This creates the new max_wind attribute with a default value of 0.0. Now update your YAML per the above with the logic to capture the maximum wind speed, this time it should update without issue.

    Using This Sensor in Mushroom Cards

    Now that the max and min values are stored in the attributes, you can easily access them in mushroom-template-card components. Here’s an example that shows the max temperature for today:

    - type: custom:mushroom-template-card
      primary: "Max Temp"
      secondary: >
        {{ state_attr('sensor.today_weather_statistics', 'max_temp') | round(1) }}°C
      icon: mdi:thermometer-high

    Or for minimum temperature:

    - type: custom:mushroom-template-card
      primary: "Min Temp"
      secondary: >
        {{ state_attr('sensor.today_weather_statistics', 'min_temp') | round(1) }}°C
      icon: mdi:thermometer-low

    And similarly for wind:

    - type: custom:mushroom-template-card
      primary: "Max Wind"
      secondary: >
        {{ state_attr('sensor.today_weather_statistics', 'max_wind') | round(1) }} mph
      icon: mdi:weather-windy

    Why I Like This Approach

    • It’s simple and fast. No need to use mulitple sensors or long-term statistics.
    • It works entirely in real-time, using native templating.
    • It powers lightweight dashboard cards with just the information I want to see.
    • It’s resettable and predictable – every day starts clean at midnight.