Tag: renewable energy

  • Generating a Beautiful Annual Solar PV Chart in Home Assistant

    This beautiful apexcharts chart gives me a clean annual view of solar PV performance month on month.
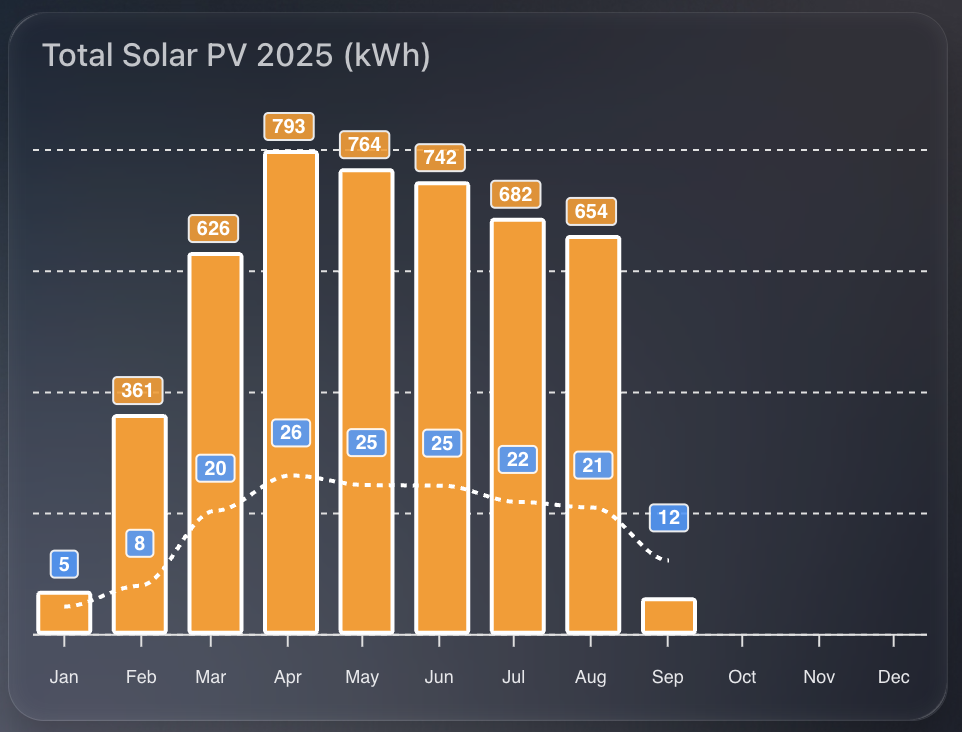
    chart showing annual solar pv generation month to month

    I show two things at once:

    1. Total kWh per month as orange columns.
    2. Average daily PV for that month as a dashed line.

    That pairing makes it easy to compare seasonal variation and spot how consistent generation is within each month.


    1) The time window

    I want a rolling 12-month view, aligned to the current year start, updating every 30 minutes.

    graph_span: 12month
    update_interval: 30m
    span:
      start: year
      offset: "-0d"

    2) Monthly totals as columns

    I read SolarEdge lifetime energy, convert Wh to kWh, then sum by month. I also enable statistics so ApexCharts aligns changes to month boundaries for accurate month on month totals.

    - entity: sensor.solaredge_lifetime_energy
      name: PV Last 12 Months
      color: var(--energy-solar-color)
      type: column
      float_precision: 0
      yaxis_id: first
      transform: return x / 1000;
      show:
        datalabels: true
      group_by:
        func: sum
        duration: 1month
        fill: zero
      statistics:
        type: change
        period: month
        align: end

    Why:

    • transform converts Wh to kWh.
    • group_by: sum gives a single monthly bar.
    • statistics: period: month ensures the change is aligned to the end of each month.

    3) Average daily PV as a dashed line

    I reuse the same entity and conversion, but average across the month, with statistics aligned by day. This produces a smooth “average day in this month” figure.

    - entity: sensor.solaredge_lifetime_energy
      name: PV Last 12 Months
      type: line
      stroke_dash: 3
      float_precision: 0
      color: "#3399FF"
      yaxis_id: second
      transform: return x / 1000;
      show:
        datalabels: true
      group_by:
        func: avg
        duration: 1month
        fill: zero
      statistics:
        type: change
        period: day
        align: end
      extend_to: false

    Why:

    • group_by: avg over a month produces the per-month daily average.
    • statistics: period: day uses daily changes to derive a meaningful daily rate.
    • stroke_dash: 3 makes the line read as a secondary metric.

    4) Dual y-axes for tidy scales

    Totals and averages sit on different ranges, so I bind columns to the left axis and the line to the right axis. Both are hidden to keep the design clean.

    yaxis:
      - id: first
        decimals: 2
        show: false
        min: 0
      - id: second
        opposite: true
        decimals: 0
        min: 0
        max: 80
        show: false

    5) Bar styling and stroke

    I keep columns compact with a subtle corner radius, and give lines a clear white stroke outline for contrast on dark themes.

    apex_config:
      plotOptions:
        bar:
          columnWidth: 28
          borderRadius: 1
      stroke:
        width: 2
        colors:
          - "#FFFFFF"

    6) Data labels with a custom formatter

    The line’s labels always show. Column labels only show for useful values, which keeps winter months uncluttered.

    apex_config:
      dataLabels:
        offsetY: -10
        style:
          fontSize: 10
        formatter: |
          EVAL: function(value, {seriesIndex, dataPointIndex, w }) {
            const roundedValue = Number(value).toFixed(0);
            if (seriesIndex === 1) {
              return roundedValue;
            }
            return roundedValue < 100 ? '' : roundedValue;
          }

    Why:

    • When seriesIndex === 1 (the dashed line), always show the rounded value.
    • For the column series, hide values below 100 kWh to avoid visual noise.

    7) Minimal legend and tooltip

    This is a glanceable tile, so I remove the legend and tooltips.

    apex_config:
      legend:
        show: false
      tooltip:
        enabled: false

    8) Month labels

    Three-letter month labels save space and remain readable.

    apex_config:
      xaxis:
        labels:
          hideOverlappingLabels: false
          rotate: 90
          show: true
          style:
            fontSize: 9
          format: MMM

    Full YAML

    type: custom:apexcharts-card
    graph_span: 12month
    update_interval: 30m
    span:
      start: year
      offset: "-0d"
    header:
      show: true
      title: Total Solar PV 2025 (kWh)
    series:
      - entity: sensor.solaredge_lifetime_energy
        name: PV Last 12 Months
        color: var(--energy-solar-color)
        type: column
        float_precision: 0
        yaxis_id: first
        transform: return x / 1000;
        show:
          datalabels: true
        group_by:
          func: sum
          duration: 1month
          fill: zero
        statistics:
          type: change
          period: month
          align: end
      - entity: sensor.solaredge_lifetime_energy
        name: PV Last 12 Months
        type: line
        stroke_dash: 3
        float_precision: 0
        color: "#3399FF"
        yaxis_id: second
        transform: return x / 1000;
        show:
          datalabels: true
        group_by:
          func: avg
          duration: 1month
          fill: zero
        statistics:
          type: change
          period: day
          align: end
        extend_to: false
    yaxis:
      - id: first
        decimals: 2
        show: false
        min: 0
      - id: second
        opposite: true
        decimals: 0
        min: 0
        max: 80
        show: false
    apex_config:
      chart:
        height: 300px
      legend:
        show: false
      plotOptions:
        bar:
          columnWidth: 28
          borderRadius: 1
      stroke:
        width: 2
        colors:
          - "#FFFFFF"
      tooltip:
        enabled: false
      dataLabels:
        offsetY: -10
        style:
          fontSize: 10
        formatter: |
          EVAL: function(value, {seriesIndex, dataPointIndex, w }) {
            const roundedValue = Number(value).toFixed(0);
            if (seriesIndex === 1) {
              return roundedValue;
            }
            return roundedValue < 100 ? '' : roundedValue;      
          }      
      xaxis:
        labels:
          hideOverlappingLabels: false
          rotate: 90
          show: true
          style:
            fontSize: 9
          format: MMM
  • Measuring Forecast PV Vs Actual PV in Realtime on Home Assistant

    One of the most powerful aspects of Home Assistant is being able to stitch together data from multiple sources to create meaningful insights. In this post, I’ll walk through how I created a sensor that compares the predicted solar generation against the actual solar energy generated by my system, giving me a live percentage difference throughout the day.

    Screenshot 2025-09-01 at 17.36.56

    This is particularly useful to understand how accurate your solar predictions are, and whether your solar generation is outperforming (or underperforming) expectations as the day progresses.

    Why this sensor?

    I use Predbat to manage my solar battery charging and discharging logic. One of its inputs is a daily solar PV forecast, which it sources from Solcast (if configured).

    While my GivEnergy inverter provides solar generation figures, I’ve found that the SolarEdge integration (via my SolarEdge export meter) provides more accurate daily totals. You can install a SolarEdge integration through Home Assistant if you have this setup. So for this comparison, I use:

    • Predbat’s detailedForecast attribute from sensor.predbat_pv_today for the expected PV generation in 30 minute slots
    • SolarEdge’s sensor.solaredge_energy_today as the actual generated PV value

    How it works

    The custom template sensor does the following:

    1. Iterates over each 30-minute slot in the Predbat detailedForecast.
    2. Sums up all past PV forecasts (based on current time) to create a "so-far" forecast.
    3. Compares that to the actual solar generated today from SolarEdge.
    4. Calculates the percentage difference, showing how far above or below the forecast we are right now.

    This is a dynamic sensor, updating as time passes and more of the forecast becomes "in the past."

    What it tells me

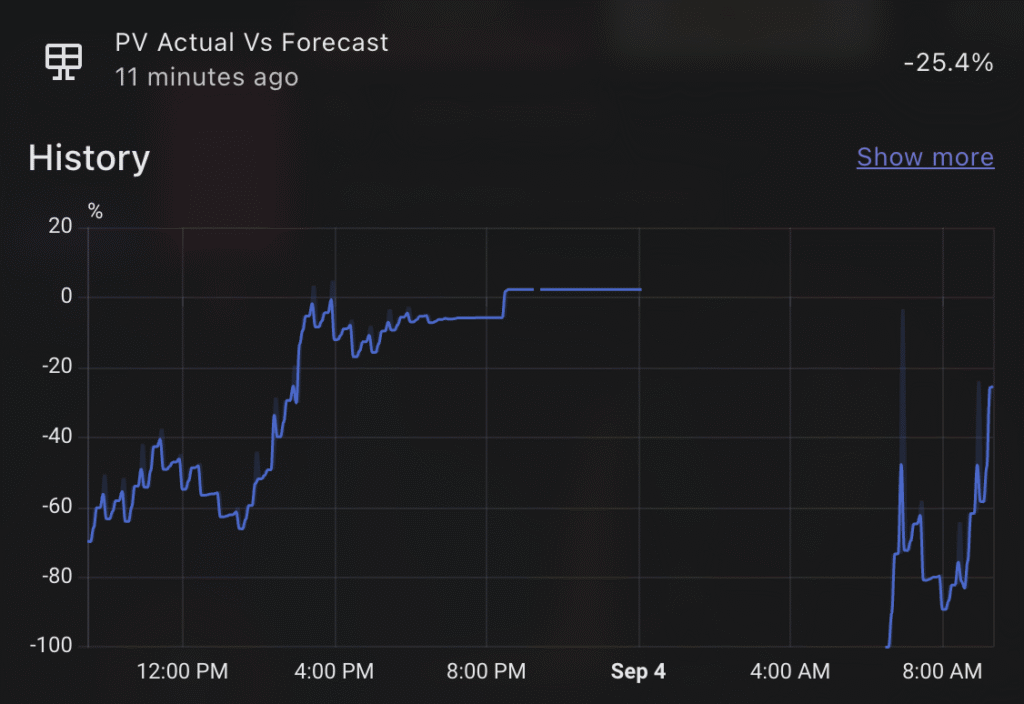
    Solar PV Prediction chart

    The resulting percentage gives me a clear sense of solar performance in real time. For example:

    • If the value is positive, I’m generating more than expected.
    • If it’s negative, I’m falling behind the forecast.

    This can help explain battery decisions, why Predbat may or may not be dispatching energy, and offer insight into Solcast’s accuracy over time. I tend to find, due to the nature of the solarEdge updates, that the PV predicted is always higher than what I have achieved, but slowly throughout the day it catches up. Sometimes I get lucky and outperform the PV prediction!

    Predbat’s DetailedForecast attribute

    Within the PV prediction entity for today, Predbat provides a DetailedForecast attribute, which is a 30 minute breakdown. My sensor is based on pv_estimate, but you can choose whichever you want, just update the YAML accordingly.

    DetailedForecast
        - period_start: 2025-09-04T15:30:00+0000
            pv_estimate: 1.96
            pv_estimate10: 0.6
            pv_estimate90: 2.44
            pv_estimateCL: 1.66
        - period_start: 2025-09-04T16:00:00+0000
            pv_estimate: 1.76
            pv_estimate10: 0.48
            pv_estimate90: 2.08
            pv_estimateCL: 2.01

    The Template Sensor YAML

    Below is the full YAML snippet you can use in your configuration.yaml or template sensor configuration file:

    sensor:
      - name: "PV Actual Vs Forecast"
        unique_id: pv_actual_vs_forecast
        state_class: "measurement"
        unit_of_measurement: "%" 
        state: >
          {% set total = namespace(value=0) %}
          {% for item in state_attr('sensor.predbat_pv_today', 'detailedForecast') %}
              {% if item.pv_estimate is number %}
                  {% if strptime(item.period_start, "%Y-%m-%dT%H:%M:%S%z") <= now() %}
                      {% set total.value = total.value + (item.pv_estimate / 2) %}
                  {% endif %}
              {% endif %}
          {% endfor %}
          {% set currentSolar = states('sensor.solaredge_energy_today') | float %}
          {% set absolute_difference = currentSolar - total.value %}
          {% set percentage_difference = (absolute_difference / total.value) * 100 %}
          {{ percentage_difference }}
        icon: mdi:solar-panel

    Note: The division by 2 (item.pv_estimate / 2) accounts for each forecast slot being half an hour, and we want pv_estimate to be the kWh value.