Tag: dashboard

  • Generating a Beautiful Annual Solar PV Chart in Home Assistant

    This beautiful apexcharts chart gives me a clean annual view of solar PV performance month on month.

    chart showing annual solar pv generation month to month

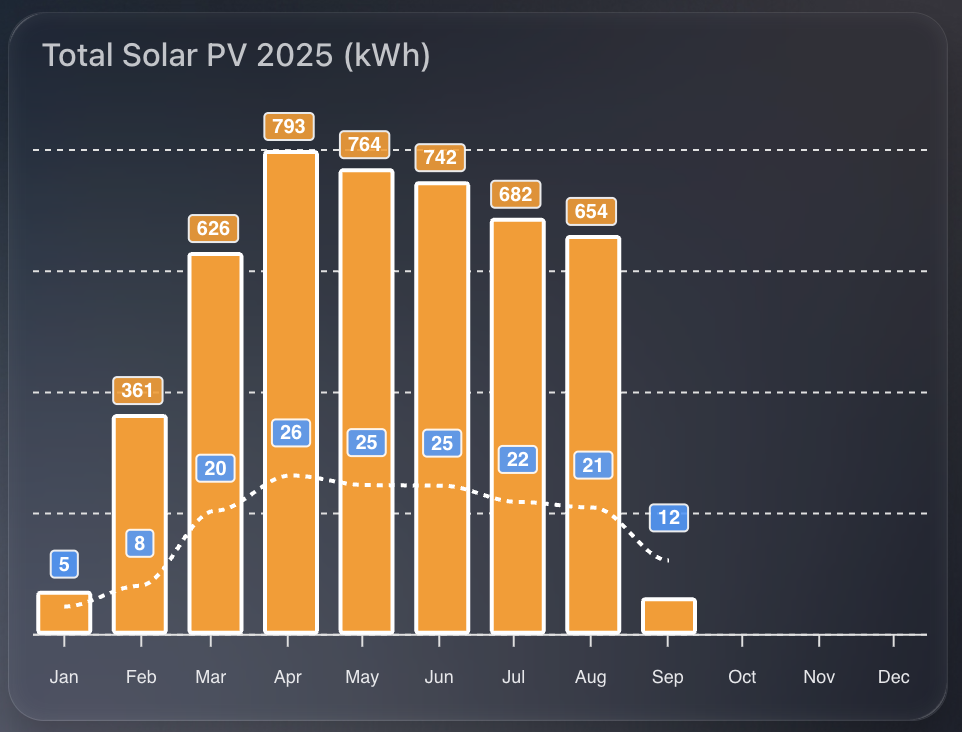
    I show two things at once:

    1. Total kWh per month as orange columns.
    2. Average daily PV for that month as a dashed line.

    That pairing makes it easy to compare seasonal variation and spot how consistent generation is within each month.


    1) The time window

    I want a rolling 12-month view, aligned to the current year start, updating every 30 minutes.

    graph_span: 12month
    update_interval: 30m
    span:
      start: year
      offset: "-0d"

    2) Monthly totals as columns

    I read SolarEdge lifetime energy, convert Wh to kWh, then sum by month. I also enable statistics so ApexCharts aligns changes to month boundaries for accurate month on month totals.

    - entity: sensor.solaredge_lifetime_energy
      name: PV Last 12 Months
      color: var(--energy-solar-color)
      type: column
      float_precision: 0
      yaxis_id: first
      transform: return x / 1000;
      show:
        datalabels: true
      group_by:
        func: sum
        duration: 1month
        fill: zero
      statistics:
        type: change
        period: month
        align: end

    Why:

    • transform converts Wh to kWh.
    • group_by: sum gives a single monthly bar.
    • statistics: period: month ensures the change is aligned to the end of each month.

    3) Average daily PV as a dashed line

    I reuse the same entity and conversion, but average across the month, with statistics aligned by day. This produces a smooth “average day in this month” figure.

    - entity: sensor.solaredge_lifetime_energy
      name: PV Last 12 Months
      type: line
      stroke_dash: 3
      float_precision: 0
      color: "#3399FF"
      yaxis_id: second
      transform: return x / 1000;
      show:
        datalabels: true
      group_by:
        func: avg
        duration: 1month
        fill: zero
      statistics:
        type: change
        period: day
        align: end
      extend_to: false

    Why:

    • group_by: avg over a month produces the per-month daily average.
    • statistics: period: day uses daily changes to derive a meaningful daily rate.
    • stroke_dash: 3 makes the line read as a secondary metric.

    4) Dual y-axes for tidy scales

    Totals and averages sit on different ranges, so I bind columns to the left axis and the line to the right axis. Both are hidden to keep the design clean.

    yaxis:
      - id: first
        decimals: 2
        show: false
        min: 0
      - id: second
        opposite: true
        decimals: 0
        min: 0
        max: 80
        show: false

    5) Bar styling and stroke

    I keep columns compact with a subtle corner radius, and give lines a clear white stroke outline for contrast on dark themes.

    apex_config:
      plotOptions:
        bar:
          columnWidth: 28
          borderRadius: 1
      stroke:
        width: 2
        colors:
          - "#FFFFFF"

    6) Data labels with a custom formatter

    The line’s labels always show. Column labels only show for useful values, which keeps winter months uncluttered.

    apex_config:
      dataLabels:
        offsetY: -10
        style:
          fontSize: 10
        formatter: |
          EVAL: function(value, {seriesIndex, dataPointIndex, w }) {
            const roundedValue = Number(value).toFixed(0);
            if (seriesIndex === 1) {
              return roundedValue;
            }
            return roundedValue < 100 ? '' : roundedValue;
          }

    Why:

    • When seriesIndex === 1 (the dashed line), always show the rounded value.
    • For the column series, hide values below 100 kWh to avoid visual noise.

    7) Minimal legend and tooltip

    This is a glanceable tile, so I remove the legend and tooltips.

    apex_config:
      legend:
        show: false
      tooltip:
        enabled: false

    8) Month labels

    Three-letter month labels save space and remain readable.

    apex_config:
      xaxis:
        labels:
          hideOverlappingLabels: false
          rotate: 90
          show: true
          style:
            fontSize: 9
          format: MMM

    Full YAML

    type: custom:apexcharts-card
    graph_span: 12month
    update_interval: 30m
    span:
      start: year
      offset: "-0d"
    header:
      show: true
      title: Total Solar PV 2025 (kWh)
    series:
      - entity: sensor.solaredge_lifetime_energy
        name: PV Last 12 Months
        color: var(--energy-solar-color)
        type: column
        float_precision: 0
        yaxis_id: first
        transform: return x / 1000;
        show:
          datalabels: true
        group_by:
          func: sum
          duration: 1month
          fill: zero
        statistics:
          type: change
          period: month
          align: end
      - entity: sensor.solaredge_lifetime_energy
        name: PV Last 12 Months
        type: line
        stroke_dash: 3
        float_precision: 0
        color: "#3399FF"
        yaxis_id: second
        transform: return x / 1000;
        show:
          datalabels: true
        group_by:
          func: avg
          duration: 1month
          fill: zero
        statistics:
          type: change
          period: day
          align: end
        extend_to: false
    yaxis:
      - id: first
        decimals: 2
        show: false
        min: 0
      - id: second
        opposite: true
        decimals: 0
        min: 0
        max: 80
        show: false
    apex_config:
      chart:
        height: 300px
      legend:
        show: false
      plotOptions:
        bar:
          columnWidth: 28
          borderRadius: 1
      stroke:
        width: 2
        colors:
          - "#FFFFFF"
      tooltip:
        enabled: false
      dataLabels:
        offsetY: -10
        style:
          fontSize: 10
        formatter: |
          EVAL: function(value, {seriesIndex, dataPointIndex, w }) {
            const roundedValue = Number(value).toFixed(0);
            if (seriesIndex === 1) {
              return roundedValue;
            }
            return roundedValue < 100 ? '' : roundedValue;      
          }      
      xaxis:
        labels:
          hideOverlappingLabels: false
          rotate: 90
          show: true
          style:
            fontSize: 9
          format: MMM
  • Building a Min-Max-Avg Temperature Chart in Home Assistant

    This guide walks you through how I created a clean, monthly temperature overview card in Home Assistant, showing maximum, minimum, and average temperatures across the year – with a live annotation for the current reading.

    Chart showing monthly temperatures for my location

    The chart provides a fantastic visual snapshot of temperature trends throughout the year and uses the excellent apexcharts-card combined with config-template-card for dynamic annotations.


    Why I Built This

    I wanted a quick way to compare month-to-month temperatures for 2025 – not just the highs and lows, but also how the average temperatures trend over time. And with the real-time temperature annotated on the chart, it’s easy to see how the current conditions stack up against the year so far.


    What You’ll Need

    Before you start, make sure you have:

    • Home Assistant running with HACS
    • Installed the following custom cards via HACS:
    • A temperature sensor that reports regularly (e.g., sensor.tempest_temperature in my case)

    How Monthly Max, Min, and Average Temperatures Work

    The magic behind this chart lies in the use of Home Assistant’s built-in long-term statistics capability, which powers the statistics: feature of apexcharts-card.

    Each series uses the following:

    • type: max and type: min with period: month to extract monthly maximum and minimum temperatures respectively
    • type: mean along with group_by.func: avg to generate a monthly average line (in white)

    This means you’re not visualising raw sensor data points, but summarised monthly metrics – ideal for year-on-year comparisons or spotting unusual weather patterns.

    You can control how values are aggregated using align: start or align: end, which defines where in the month each value is anchored on the timeline.


    How the Live Annotation Works

    This chart includes a live annotation showing the current temperature as a small dot with a label.

    This is done using the annotations: section of ApexCharts, made dynamic by wrapping the entire card in a config-template-card.

    Here’s what happens:

    • We define datenow using JavaScript to get the timestamp for the first day of the current month
    • We read the current value from the sensor (sensor.tempest_temperature) using states[...]
    • We format that value to one decimal place and append the unit (°C)
    • These variables (${datenow}, ${temp}, ${tempString}) are injected into the chart’s annotations dynamically

    Without config-template-card, you couldn’t do this interpolation – it’s what allows us to reference JavaScript and Home Assistant state directly within the card definition.


    Customising the X-Axis Labels

    A small detail, but one that makes a big visual difference: the X-axis month labels are rotated and styled for clarity.

    xaxis:
      labels:
        rotate: 90
        style:
          fontSize: 9
        format: MMM

    This does three things:

    1. Rotates the labels so they don’t overlap
    2. Uses short month format (e.g. Jan, Feb, Mar) for a cleaner look
    3. Applies smaller font size to avoid clutter

    This is particularly useful when plotting an entire year, where 12 data points can otherwise get cramped.


    YAML Configuration

    Below is the full YAML you can drop into your dashboard. I used sensor.tempest_temperature as the data source, but you can replace it with any temperature sensor you have.

    type: custom:config-template-card
    variables:
      datenow: new Date(new Date().getFullYear(), new Date().getMonth(), 1).getTime()
      temp: parseFloat(states["sensor.tempest_temperature"].state)
      tempString: >-
        parseFloat(states["sensor.tempest_temperature"].state).toFixed(1) +
        states["sensor.tempest_temperature"].attributes.unit_of_measurement
    entities:
      - sensor.tempest_temperature
    card:
      type: custom:apexcharts-card
      update_interval: 30m
      graph_span: 11month
      span:
        start: year
      header:
        show: true
        title: Max|Min Temps 2025 (°C)
      now:
        show: false
      series:
        - entity: sensor.tempest_temperature
          name: Max Temp
          type: area
          color: "#e63946"
          opacity: 0.3
          float_precision: 1
          show:
            datalabels: true
          statistics:
            type: max
            period: month
            align: start
          extend_to: false
    
        - entity: sensor.tempest_temperature
          name: Min Temp
          type: area
          color: "#457b9d"
          opacity: 0.3
          float_precision: 1
          show:
            datalabels: true
          statistics:
            type: min
            period: month
            align: start
          extend_to: false
    
        - entity: sensor.tempest_temperature
          name: Avg Temp
          type: line
          color: "#ffffff"
          stroke_dash: 3
          float_precision: 1
          opacity: 0.8
          show:
            datalabels: false
          group_by:
            func: avg
            duration: 1month
            fill: zero
          statistics:
            type: mean
            period: month
            align: end
          extend_to: false
    
      apex_config:
        chart:
          height: 200px
        legend:
          show: false
        tooltip:
          enabled: false
        stroke:
          width: 2
        dataLabels:
          offsetY: -5
          style:
            fontSize: 9px
          formatter: |
            EVAL:function(val, opts) {
              return val.toFixed(1) + "°C";
            }
        xaxis:
          labels:
            hideOverlappingLabels: false
            rotate: 90
            show: true
            style:
              fontSize: 9
            format: MMM
        yaxis:
          show: false
        annotations:
          points:
            - x: ${datenow}
              y: ${temp}
              marker:
                size: 2
                shape: circle
                fillColor: "#FFFFFF"
                strokeColor: "#FFFFFF"
              label:
                offsetX: 26
                offsetY: 11
                text: ${tempString}
                style:
                  fontSize: 9
                  color: "#000000"

    Final Thoughts

    This kind of chart makes your Home Assistant dashboard much more informative. With a little templating and the power of ApexCharts, you can surface meaningful trends without needing to dive into graphs or statistics manually.

    The addition of dynamic annotations, paired with Home Assistant’s native statistics engine, creates a beautiful and functional visual that updates automatically.