This guide walks you through how I created a clean, monthly temperature overview card in Home Assistant, showing maximum, minimum, and average temperatures across the year – with a live annotation for the current reading.
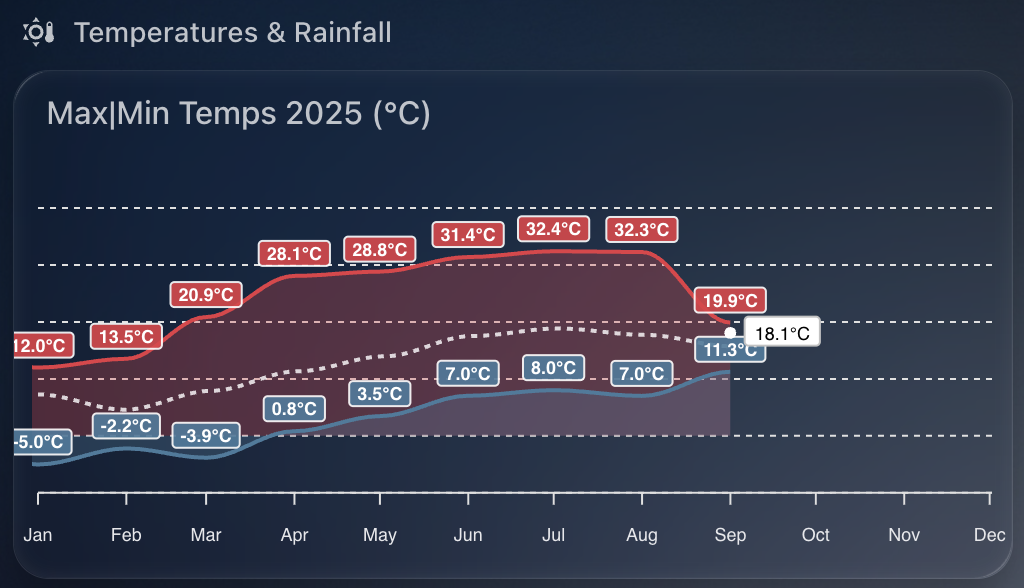
The chart provides a fantastic visual snapshot of temperature trends throughout the year and uses the excellent apexcharts-card combined with config-template-card for dynamic annotations.
Why I Built This
I wanted a quick way to compare month-to-month temperatures for 2025 – not just the highs and lows, but also how the average temperatures trend over time. And with the real-time temperature annotated on the chart, it’s easy to see how the current conditions stack up against the year so far.
What You’ll Need
Before you start, make sure you have:
- Home Assistant running with HACS
- Installed the following custom cards via HACS:
- A temperature sensor that reports regularly (e.g.,
sensor.tempest_temperaturein my case)
How Monthly Max, Min, and Average Temperatures Work
The magic behind this chart lies in the use of Home Assistant’s built-in long-term statistics capability, which powers the statistics: feature of apexcharts-card.
Each series uses the following:
type: maxandtype: minwithperiod: monthto extract monthly maximum and minimum temperatures respectivelytype: meanalong withgroup_by.func: avgto generate a monthly average line (in white)
This means you’re not visualising raw sensor data points, but summarised monthly metrics – ideal for year-on-year comparisons or spotting unusual weather patterns.
You can control how values are aggregated using align: start or align: end, which defines where in the month each value is anchored on the timeline.
How the Live Annotation Works
This chart includes a live annotation showing the current temperature as a small dot with a label.
This is done using the annotations: section of ApexCharts, made dynamic by wrapping the entire card in a config-template-card.
Here’s what happens:
- We define
datenowusing JavaScript to get the timestamp for the first day of the current month - We read the current value from the sensor (
sensor.tempest_temperature) usingstates[...] - We format that value to one decimal place and append the unit (°C)
- These variables (
${datenow},${temp},${tempString}) are injected into the chart’s annotations dynamically
Without config-template-card, you couldn’t do this interpolation – it’s what allows us to reference JavaScript and Home Assistant state directly within the card definition.
Customising the X-Axis Labels
A small detail, but one that makes a big visual difference: the X-axis month labels are rotated and styled for clarity.
xaxis:
  labels:
    rotate: 90
    style:
      fontSize: 9
    format: MMM
This does three things:
- Rotates the labels so they don’t overlap
- Uses short month format (e.g. Jan, Feb, Mar) for a cleaner look
- Applies smaller font size to avoid clutter
This is particularly useful when plotting an entire year, where 12 data points can otherwise get cramped.
YAML Configuration
Below is the full YAML you can drop into your dashboard. I used sensor.tempest_temperature as the data source, but you can replace it with any temperature sensor you have.
type: custom:config-template-card
variables:
  datenow: new Date(new Date().getFullYear(), new Date().getMonth(), 1).getTime()
  temp: parseFloat(states["sensor.tempest_temperature"].state)
  tempString: >-
    parseFloat(states["sensor.tempest_temperature"].state).toFixed(1) +
    states["sensor.tempest_temperature"].attributes.unit_of_measurement
entities:
  - sensor.tempest_temperature
card:
  type: custom:apexcharts-card
  update_interval: 30m
  graph_span: 11month
  span:
    start: year
  header:
    show: true
    title: Max|Min Temps 2025 (°C)
  now:
    show: false
  series:
    - entity: sensor.tempest_temperature
      name: Max Temp
      type: area
      color: "#e63946"
      opacity: 0.3
      float_precision: 1
      show:
        datalabels: true
      statistics:
        type: max
        period: month
        align: start
      extend_to: false

    - entity: sensor.tempest_temperature
      name: Min Temp
      type: area
      color: "#457b9d"
      opacity: 0.3
      float_precision: 1
      show:
        datalabels: true
      statistics:
        type: min
        period: month
        align: start
      extend_to: false

    - entity: sensor.tempest_temperature
      name: Avg Temp
      type: line
      color: "#ffffff"
      stroke_dash: 3
      float_precision: 1
      opacity: 0.8
      show:
        datalabels: false
      group_by:
        func: avg
        duration: 1month
        fill: zero
      statistics:
        type: mean
        period: month
        align: end
      extend_to: false

  apex_config:
    chart:
      height: 200px
    legend:
      show: false
    tooltip:
      enabled: false
    stroke:
      width: 2
    dataLabels:
      offsetY: -5
      style:
        fontSize: 9px
      formatter: |
        EVAL:function(val, opts) {
          return val.toFixed(1) + "°C";
        }
    xaxis:
      labels:
        hideOverlappingLabels: false
        rotate: 90
        show: true
        style:
          fontSize: 9
        format: MMM
    yaxis:
      show: false
    annotations:
      points:
        - x: ${datenow}
          y: ${temp}
          marker:
            size: 2
            shape: circle
            fillColor: "#FFFFFF"
            strokeColor: "#FFFFFF"
          label:
            offsetX: 26
            offsetY: 11
            text: ${tempString}
            style:
              fontSize: 9
              color: "#000000"
Final Thoughts
This kind of chart makes your Home Assistant dashboard much more informative. With a little templating and the power of ApexCharts, you can surface meaningful trends without needing to dive into graphs or statistics manually.
The addition of dynamic annotations, paired with Home Assistant’s native statistics engine, creates a beautiful and functional visual that updates automatically.